Sunday, December 26, 2010

Cheddar Cheese Puffs


For Christmas Eve this year I decided to make a huge pot of Minestrone soup and some finger foods to set around the coffee table. It certainly had a nice informal feel to it; each of us could grab a bowl of soup and park ourselves by the Christmas tree. I decided to try my hand at Cheddar Cheese Puffs and they turned out to be a delicious accompaniment to the soup. Perfect for dipping.

These cheese puffs were so easy to make. If you can boil water, you can make these incredibly addictive cheese puffs. It's actually the water in the dough that steams and creates air pockets while the puffs bake in the oven. The result is something like a popover without having to use a popover pan. When you serve these at the table, people will think you probably mastered fancy French cooking when all the while you know it was as simple as boiling water!

The recipe came from Simply Recipes. You can go on over here if you want the step by step pictures.

Ingredients

* 1 stick butter (8 Tbsp or 4 ounces)
* 1 cup water
* 1/2 teaspoon salt
* 1 cup all purpose flour
* 4 large eggs
* 1 cup (4 ounces) grated sharp cheddar cheese
* 2 teaspoons chopped fresh thyme (or rosemary)
* Freshly ground pepper

1 In a medium sized saucepan, add the water, butter, and salt, and bring to a boil over high heat.

2 Reduce the heat to medium and add the flour all at once. Stir rapidly. The mixture will form a dough ball that will pull away from the sides of the pan. It helps to use a wooden spoon to stir as the dough will be rather thick. Continue to cook for a couple minutes.

cheddar-cheese-puffs-4a.jpg cheddar-cheese-puffs-5.jpg

3 Remove the pan from the heat and let cool for a couple of minutes. Stir so that the dough cools more evenly. You want the dough to be warm, just not so hot that when you start adding eggs they cook as they hit the dough. Add the eggs one at a time, stirring after each addition until the eggs are incorporated into the dough. (Do this part in a mixer if you want, or by hand with a wooden spoon.) The dough should become rather creamy.

4 Stir in the grated cheese, thyme, and a few grinds of pepper.

5 Preheat oven to 425°F. Spoon out small balls (about a heaping tablespoon) of the dough onto a Silpat or parchment lined baking sheet, with at least an inch separating the spoonfuls. Place in oven and cook for 10 minutes at 425°F. Lower heat to 350°F and cook for another 15-20 minutes, until puffed up and lightly golden.

Makes about 2 dozen.

Sunday, December 19, 2010

Paneer


I have long been a fan of Indian cuisine. On Friday night, Breen and I went for some Indian food. Usually I order the Dal Makhal but recently I've become absolutely smitten with Paneer in curry sauce. Paneer is a type of Indian cheese which is usually served up in main dishes in the form of dense little cheese cubes. So I had the bright idea right then and there in the restaurant to make Paneer myself the next day.

It starts off with a half gallon of milk (I used whole milk) in a heavy bottom saucepan heated until it boils. After the milk boils a half cup of hot water and a quarter cup of lemon juice is added. This addition causes the milk to separate and solid curds are formed.

After the curds are formed, they get rinsed in a cheesecloth lined strainer.

When you squeeze as much water out as you possibly can, the dense ball of curds gets pressed down with something heavy for 2 hours.


After 2 hours you have a nice block of Paneer which is ready to be cut in to cubes and added to a favorite curry sauce.


That's it. It really is easy and delicious! Try it with a can of coconut milk simmered with curry and a nice handful of toasted almonds on top of some Basmati rice.

Ingredients:

* 8 cups (half gallon) milk
* 1/4 cup lemon Juice

Method:

1. Mix lemon juice in half cup of hot water and put aside.
2. Boil the milk in a heavy bottomed pan over medium heat, stirring occasionally, making sure not to burn milk.
3. As the milk comes to a boil, add the lemon juice gradually and stir the milk gently. The curd will start separating from the whey, turn off the heat.
4. Once the milk fat has separated from the whey, drain the whey using a strainer line with cheesecloth, or muslin cloth.
5. Wrap the curds in a muslin cloth, rinse under cold water, and squeeze well. This process takes out the sourness from the lemon.
6. To take out the excess water, press the wrapped paneer under a heavy pan for about 1 hour.

Tips:

If paneer will be used to make any dessert dish:

1. The most important part of making paneer for dessert is how much water to take out from the paneer.
2. To check if right amount of water is out of the paneer, take a little piece of paneer on your palm and rub with your fingers. After rubbing the paneer for about 15-20 seconds, you should be able to make a firm but smooth ball.
3. For making sweets, paneer can be refrigerated for 1 to 2 days.
4. Paneer from half-gallon milk will make about 15 to 20 rasgullas.
5. I suggest 2% milk for rasgullas, rasmalai, chamcham or any other dish in that category.
6. For sandaish, burfee or any other such dish use regular milk.

If paneer will be used for making main dishes:

1. Before Pressing the paneer knead it enough so paneer is not crumbly.
2. Press the paneer instead one hour, two hours making firmer.
3. Cut the paneer to desired shape. Paneer can be refrigerated for a few days or kept frozen for months.

Wednesday, November 24, 2010

Cheddar Pepper Palmiers


Recently I saw a post for palmiers dusted with sugar. I made a mental note to make them. Then, a few days later, I randomly came across a recipe for Cheddar Pepper Palmiers. For those of you unfamiliar with palmiers, they are a simple and delicious pastry made from puffed pastry. They get their name from the shape of a palm leaf.

I served these hot from the oven last night as a nice addition to a big platter of spaghetti and meatballs. They were finished off very quickly. There was a time when I was afraid to use puffed pastry because it seemed too delicate and complicated. But now that I'm an old pro using phyllo dough, the puffed pastry was so simple that a kindergartner could have made these. And let me just say that if I had been in charge of catering The Last Supper, I would have filled big baskets at the table with these Cheddar Pepper Palmiers and let the fellows dig in.

Ingredients

1 1/4 cup finely grated sharp Cheddar; 3 1/2 ounces
1/4 cup finely grated Parmigiano-Reggiano cheese
2 teaspoons freshly ground black pepper
1/2 teaspoon salt
2 puff pastry sheets (from a 17.3-ounce package); thawed if frozen

Directions

Toss Cheddar, Parmigiano-Reggiano, pepper, and salt in a bowl.

Sprinkle 1/4 cup cheese mixture onto a work surface. Unfold 1 pastry sheet and place over cheese. Roll into a 10-inch square, then sprinkle 1/2 cup cheese mixture all over top of pastry, pressing lightly to adhere. Fold sides of 2 ends to meet in center, then fold once more into center and press ends together. Wrap tightly in plastic wrap and chill until firm, about 1 hour (or freeze 15 to 30 minutes). Repeat with remaining cheese and second sheet of pastry.

While dough chills, preheat oven to 400F with racks in upper and lower parts of oven. Line 2 large baking sheets with parchment paper.

Working with 1 piece at a time (keep remaining chilled until ready to use), unwrap pastry and cut, seam side up, into 1/4-inch-thick slices, arranging them 1 inch apart on baking sheets. Bake, turning palmiers over and switching position of pans halfway through, until golden and pastry is cooked through, 18 to 22 minutes total. Transfer palmiers to rack to cool. Repeat cutting and baking remaining pastry on cooled sheets.

Make ahead: Dough can be assembled up to 3 days ahead. Palmiers can be baked 1 day ahead and kept in an airtight container at room temperature.
about this recipe

Palmiers are French pastries in the shape of palm leaves. This miniaturized savory version is made with cheese and a hint of black pepper, and make an ideal accompaniment to a glass of wine.

Sunday, November 21, 2010

Cheese Cranberry Cookies


With Thanksgiving only four days away, I tried to think of something fitting to express my thanks for the creation of cheese. I was on the fence at first when I came across this recipe but I'm glad my faith in fromage saw me through. It is right to give thanks and praise to the Cheese Cranberry Cookie. The delicious taste of the cheese complimented with a bite of sweet cranberry filling makes think of a perfect little Thanksgiving meal rolled in to one cookie. Minus the turkey. But let's be honest. Who cares about turkey when you've got these on the table?

Let me just say that if the priests would start using these instead of the stale communion wafer, I'd go back to church every Sunday.

I found the recipe in an old copy of The Encyclopedia of Creative Cooking edited by Charlotte Turgeon that my mother gave me. It's a bit retro in feel but I like that. Besides, with a cookbook crammed with 2000 recipes, there's bound to be a few dozen I can't live without. Just two quick notes:

1. I toasted the pecans before putting them in the filling for extra crunch and flavor.
2. I sifted a bit of confectioner's sugar on them when they got out of the oven.

Now drop down and give me three Hail Marys for the amount of these you will consume in less than a half hour.


Recipe:

2 cups of sifted flour
2 cups of grated cheddar cheese
1/2 teaspoon of salt
1/2 cup of butter or margarine
1/4 cup of milk

Preheat oven to 400*

Mix flour, cheese and salt. Cut in butter with pastry blender or your hands. Add milk. Roll dough in foil. Chill. Roll thinly on lightly floured board. Cut in to desired shapes. Spread half the shapes with filling. Cover with remaining shapes. Press edges well together. Place on a piece of parchment paper on a cookie sheet. Bake about 10 minutes. Yields 30.

Filling:

3/4 cup of cranberry jelly
1 1/2 cups of chopped pecans
1/2 teaspoon salt
2 tablespoons brown sugar
1/4 teaspoon ground cinnamon

Break up jelly with fork, add other ingredients and mix well.

Monday, October 4, 2010

Cauliflower and Cheddar Cheese Soup


This is my first soup of the season and it comes from The Great Big Cheese Cookbook. Today is one of those chilly and rainy fall days here in Philadelphia. It only seemed fitting to make a nice warm soup while I hibernated inside for the day. The best part is that I had everything on hand. I made a few modifications to the recipe. Instead of using a head of white cauliflower, I purchased last week a gorgeous head of Fiesta Cauliflower which is a beautiful shade of orange. Also, because I was using orange cauliflower, I substituted the carrots for a few strips of roasted red peppers. This was a relatively quick and easy soup to put together. The most labor intensive part is the chopping on the front end. After that, it's as simple as cooking the chopped items in the broth and then putting it through the blender after it cools.

Did you know how good cauliflower is for you? Cauliflower is a member of the cruciferous vegetable family. Cruciferous vegetables are considered to be "super veggies" that are packed with vitamins, fiber and disease fighting phytochemicals. When I'm not using it in soup, I love to eat my cauliflower roasted and baked in a gratin with black olives and a mustard cream sauce. Thank God my taste buds have changed over the years because I remember when I was growing up the only vegetable that I was willing to eat was corn.

Here's a few facts about the fiesta cauliflower:

1. It has so much beta carotene that it actually turns the cauliflower orange.
2. It has 25% more Vitamin A than white cauliflower.

Happy eating!

Ingredients

4 cups chicken broth or water
2 cups chopped potatoes
3 1/2 cups cauliflowerets, divided
1 cup chopped onion
1 cup chopped carrot
3 garlic cloves, minced
1 1/2 teaspoons salt
1 1/2 cups (6 oz) cheddar cheese
1/4 teaspoon dill
1/4 teaspoon dry mustard
1/4 teaspoon pepper
3/4 cup milk
1 tablespoon all purpose flour
2 tablespoons butter

Combine the broth, potatoes, cauliflowerets, onion, carrot, garlic and salt in a large saucepan. Bring slowly to a boil and simmer for 15 minutes. Remove from heat and let cool for 20 minutes. Puree in a blender.

Return the puree to the saucepan and over low heat, gradually add the cheese, dill, dry mustard and pepper. Stir until the cheese melts.

In a small bowl whisk together the milk and flour until smooth. Slowly pour in to the hot soup, stirring until well blended about 5 minutes.

Saute the remaining 1 1/2 cups of cauliflowerets in butter until crisp and tender. Add to the soup.

Spring salad with candied walnuts and blueberry vanilla goat cheese


If you need one more reason to run out and buy the Blueberry Vanilla Goat Cheese from Trader Joe's, this is it. Last night I made a spring salad with candied walnuts and blueberry vanilla goat cheese. This was such a delicious and refreshing salad that I'm sure to make again. One of the things I loved the best was the tiny little wild blueberries that imparted themselves in to the salad mix. If you can't find this cheese and/or don't have a Trader Joe's near you, crumbled goat cheese or gorgonzola would do the same minus the delicious vanilla flavor and little blueberries.


Ingredients

1/2 cup walnut halves
1/4 cup sugar
3 cups mixed greens
1/2 cup crumbled blueberry vanilla goat cheese
1 tablespoon raspberry vinaigrette
1 tablespoon white vinegar
1 tablespoon olive oil

Directions

1. Place walnuts and sugar in a skillet over medium heat, stirring constantly until the sugar dissolves into a light brown liquid and coats the walnuts. Remove walnuts from skillet, and spread them out on a sheet of aluminum foil to cool.
2. Place in a large salad bowl the mixed greens, cheese, vinaigrette, vinegar, and olive oil. Toss gently; add candied walnuts, and toss again.

Sunday, October 3, 2010

Blueberry vanilla goat cheese


For the love of Christ, don't walk....sprint like a madman....over to your local Trader Joe's for a log of their blueberry vanilla goat cheese! Studded with tiny wild blueberries soaked in vanilla, this goat cheese is worth every last Hail Mary you'll have to do for the sin of eating the entire log by yourself in one sitting without offering to share it with anyone. When I passed by the cheese section at Trader Joe's the other day, I knew there was no way it wasn't going in my cart. At $4.29 for an 8oz log, you just can't beat it. I decided to pair it with a plate of fresh sliced pears. The creamy vanilla/blueberry/goat cheese goes together so well with the texture and slight sweetness that only a pear can bring. But of course, I'm also going to try it crumbled in to a bed of baby field greens with a light vinaigrette and some candied walnuts. Why are you still reading??? Get yourself over to the store now!

Wednesday, September 22, 2010

Cheddar Crunch Apple Squares


Holy Moly, was this ever good! I'm not quite sure why this recipe was named "squares" and not "crisp" but either way you'll still love it. This recipe comes from page 447 of The Great Big Cheese Cookbook which, in my opinion, is a must have cheese book. The final outcome produces a mild flavor of vanilla, cinnamon, coconut and cheddar cheese while the apple filling adds to its delicious sweetness. Think of it as an "apple pie with cheddar cheese" kind of dessert. It could not have been an easier recipe to throw together. Thanks to the invention of the food processor and the can opener, you can have this dish ready for the oven in minutes and people will think you labored much longer. I know that some people out there are allergic to coconut so just be aware that it's optional but does provide a wonderful little toasted crunch. Also, if you want to serve it as a warm crisp, let it cool down a little and scoop it right out of the dish. If you want it served in firmer squares you'll have to refrigerate it until it completely cools.

Ingredients:
1(12 oz) box of nilla wafers
1 1/2 cups of flaked coconut
1/2 teaspoon of ground cinnamon
1 1/2 cups of shredded cheddar cheese
1 stick of salted butter, softened
2 (21 oz) cans of apple pie filling
ice cream or warmed honey to serve

Preheat oven to 375

Using the food processor or rolling pin, crush the wafers in to crumbs and combine with coconut, cinnamon, cheese and butter to form a crumbly mixture.

Press half of the crumbly mixture firmly in to the bottom of a greased 13x9 baking dish.

Spread the apple pie filling on top of the bottom crust. Top with the remaining crumb mixture. Do not press down.

Bake for about 40 minutes or until golden brown.

Remove from oven and place the pan on a wire rack. Place the rack in the refrigerator to cool completely. Cut in to 2 inch squares and serve with ice cream or warmed honey.

Sunday, September 12, 2010

Swiss Bacon Dip


Life was very busy over the summer and hence the reason for so few posts here. But fall is finally upon us and I know this because the NFL officially started Sunday afternoon games today. I love this time of year. Today I decided to make a hot swiss bacon dip for us to nibble on while the games got underway. Oh my lord was this good stuff! I'm sure even Jesus could smell it all the way from heaven.

I found this recipe from Rachael Ray. I added some horseradish to the recipe and I think it made the dip extra delicious. I never could resist any kind of hot dip. The flavors of the bacon, swiss, dijon, scallions and horseradish make this dish memorable. Oh, and the almonds. A big handful of slivered, smoked almonds making a crust over the whole thing! Slice up some fresh red peppers and add some crackers for dipping. Absolutely heavenly!

Ingredients:

* 8 slices center cut bacon, chopped
* 8 ounces softened cream cheese
* 1/2 cup mayonnaise
* 2 rounded teaspoons prepared Dijon style mustard
* 1 1/2 cups shredded Swiss cheese, available on dairy aisle
* 3 scallions, chopped
* 1/2 cup smoked almonds, coarsely chopped
* Baby carrots and a selection of spiced flat breads, cocktail sized pumpernickel or rye breads, or sliced whole grain baguettes, for dipping

Directions

Preheat oven to 400 degrees F.

Brown bacon in nonstick skillet over medium high heat. Drain crisp bacon bits on paper towels.

In a mixing bowl, combine cream cheese, mayonnaise, Dijon, Swiss and scallions with cooked bacon. Transfer to a shallow small casserole or baking dish and bake until golden and bubbly at edges, 15 to 18 minutes. Top with chopped smoked almonds. Place dip on a platter and surround warm casserole with breads and carrots for dipping.

Variation: Swiss and Bacon Dip with Horseradish - Stir in 2 rounded teaspoons prepared horseradish when combining cheese and bacon.

Wednesday, August 4, 2010

Crook's Corner Shrimp and Grits


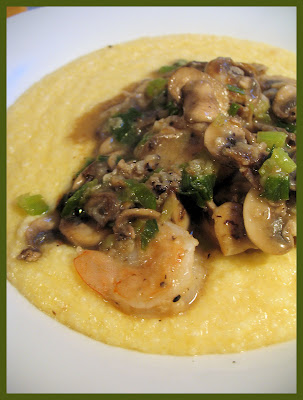
A few years ago I had the pleasure of having brunch at Humble Pie in Raleigh, North Carolina. An old warehouse converted in to a hip urban eatery, the food was fantastic and the Bloody Marys too. My order of shrimp and grits was so memorable that here I am years later writing about it here. In fact, the shrimp and grits are so good at Humble Pie, they are listed on the menu as "broth of the Gods." I did some research and found the recipe from Crook's Corner, another popular North Carolina restaurant in Chapel Hill. I grew up eating grits with my father who was raised for part of his childhood in the south. We used to smother ours with butter and fresh pepper. Then I discovered that cheese is the secret ingredient that elevates plain grits to something godly.

We had this for dinner last night and there wasn't a trace of it left by the time we licked our bowls clean. I wish the photo did this dish more justice. Trust me, it was incredible; all of the flavors completely enhanced each other from the sharp cheddar and Parmesan in the grits to the mushrooms, bacon, scallions and shrimp that sat in a broth that was indeed worthy of God coming over here for dinner. I think part of the success in this dish is the addition of some hot sauce. I don't like things too hot but a few splashes in both the shrimp mixture and the grits made this really spectacular. You can go over here to see the rave reviews on this dish.

RECIPE


Ingredients

* 2 cups water
* 1 (14-ounce) can chicken broth
* 3/4 cup half-and-half
* 3/4 teaspoon salt
* 1 cup regular grits
* 3/4 cup shredded Cheddar cheese
* 1/4 cup grated Parmesan cheese
* 2 tablespoons butter
* 1/2 teaspoon hot sauce (or to taste)
* 1/4 teaspoon white pepper
* 3 bacon slices
* 1 pound medium-size shrimp, peeled and deveined
* 1/4 teaspoon black pepper
* 1/8 teaspoon salt
* 1/4 cup all-purpose flour
* 1 cup sliced mushrooms
* 1/2 cup chopped green onions
* 2 garlic cloves, minced
* 1/2 cup low-sodium, fat-free chicken broth
* 2 tablespoons fresh lemon juice
* 1/4 teaspoon hot sauce (or to taste)
* Lemon wedges

Preparation

Bring first 4 ingredients to a boil in a medium saucepan; gradually whisk in grits. Reduce heat, and simmer, stirring occasionally, 10 minutes or until thickened. Add Cheddar cheese and next 4 ingredients. Keep warm.

Cook bacon in a large skillet until crisp; remove bacon, and drain on paper towels, reserving 1 tablespoon drippings in skillet. Crumble bacon, and set aside.

Sprinkle shrimp with pepper and salt; dredge in flour.

Sauté mushrooms in hot drippings in skillet 5 minutes or until tender. Add green onions, and sauté 2 minutes. Add shrimp and garlic, and sauté 2 minutes or until shrimp are lightly brown. Stir in chicken broth, lemon juice, and hot sauce, and cook 2 more minutes, stirring to loosen particles from bottom of skillet.

Serve shrimp mixture over hot cheese grits. Top with crumbled bacon; serve with lemon wedges.

Tuesday, August 3, 2010

Harold's strawberries and cream with buttery basil cookies


This was one of the first recipes I came across when I was initially researching cheese books for this blog. It comes from Laura Werlin's Cheese Essentials; a book, in my opinion, that is a must have for every person interested in learning about cheese. It's small enough that you could stow it away in your handbag yet filled with such great quantities of information that you'll look like a cheese rock star when you step in to a cheese shop and begin to discuss the varieties of surface ripened cheeses.

The recipe was created by Harold Dieterle, a former Iron Chef winner. Immediately I was hooked by the idea of baking a cookie with basil as an ingredient. I've also been interested in finding a dessert recipe that stars cheese in a main role. The sweetness of the vanilla infused strawberries, the creamy earthiness of the brie and the indescribable pleasure of a soft, buttery basil cookie all work together to make this worthy of an Oscar. And the cookie, oh the blessed cookie! Light, buttery, slightly sweet with a nice hint of basil. It's one of the best things I've tasted in such a long time and such a simple thing to make too. What an excellent way to use up the abundance of summer strawberries and fresh basil. Serve this up for dessert at your next dinner party and your guests will be oohing and ahhing for sure.

Side note: the recipe calls for a nice big wedge of La Tur cheese, which is a surfaced ripened creamy cheese. So creamy in fact that it could be eaten with a spoon. It is said to be the crown jewel of all surface ripened cheeses. Unfortunately, my local cheese shop doesn't carry it so I ended up with a nice wedge of double cream brie. Next time I'm going for the La Tur even if it means putting on my cheese radar and driving 30 miles to find it.

RECIPE

For the cookies:
2 egg whites
1/3 cup sugar
3 tablespoons melted unsalted butter
1/3 cup flour
2 teaspoons of fresh basil, julienned and one sprig for garnish
2 tablespoons sliced almonds, lightly toasted

For the strawberries:
3/4 cup of water
1/3 cup of sugar
2 cups strawberries, stems removed and quartered
1 teaspoon vanilla extract

Cheese:
8oz of La Tur cheese (or similar soft brie style cheese)

To make the cookies:

Preheat oven to 350 degrees. In the bowl of a stand mixer, with a whisk attachment, beat the egg whites until frothy, about 2 minutes (a hand mixer will do the job too). Slowly add the sugar until soft peaks form, about 5 to 10 minutes. Slowly drizzle the melted butter in to the egg white mixture and mix for 1 minute. Add the flour and basil and mixed until incorporated.

Line a baking sheet with parchment paper. Mound tablespoons of the batter 2 inches apart on the sheet. Place about 2-3 almonds on each cookie. Bake until golden brown, about 10 to 12 minutes. Let cool to room temperature. Cookies are best when eaten that day but you can also store them in an airtight container for up to 2 days.
Makes 16 cookies.

To prepare the strawberries:

In a medium size saucepan, combine water and sugar over high heat. Cook, stirring constantly, until the mixture comes to a boil. Let cook 1 more minute. Turn off the heat and let cool to room temperature, about 45 minutes. This is your "simple syrup."

Measure out 1/3 cup of the simple syrup. Reserve the rest for another use. Put the strawberries, simple syrup and vanilla in a saucepan you used to make the simple syrup. Bring to a simmer and cook for 2 minutes. Turn off heat and let come to room temperature. The strawberries will continue to release liquid as they cool.

To assemble:

Place 2 cookies on either side of 8 dessert plates. Place a slice of cheese in the middle of the plate. Using a slotted spoon, put a few strawberries next to the cheese. Garnish with a sprig or two of fresh basil on each plate. Serve right away.

Thursday, July 29, 2010

Blue Cheese, pear, bacon and sage pizza


What better way to kick off this new blog than with a simple recipe involving my all time favorite cheese. There are numerous types of blue cheese but my favorite is Saga Blue and boy was I happy when I found it crumbled in the cheese department yesterday at my local grocery store. If you can't find Sage Blue, most stores carry 4 oz containers of Gorgonzola or standard blue cheese.

I've wanted to try this pizza recipe for quite some time. I love the idea of the pungent blue cheese mixed with the mellowness of a Bosc pear and the smokiness of bacon. The sage was a last minute idea because I happen to love it AND I have enough of it growing out in my front yard for a lifetime. Also, since it was just me for lunch today and I wanted something a little lighter than pizza dough, I opted to build my pizza on a soft tortilla wrap and it was just the right personal size for me with one wedge leftover which I'm sure my husband will devour when he comes home from work later. The end result was a marvelous taste explosion for my taste buds.

Recipe:

Ingredients

One 10 inch round soft tortilla wrap
One ripe Bosc pear; cored and sliced in to thin slices
2 oz Crumbled Blue Cheese
One fresh sage leaf, finely chopped
3 slices of bacon; cooked and crumbled

1. Preheat oven to 350
2. Cook bacon in a pan until well cooked; drain, set aside and crumble
3. Sprinkle some Blue Cheese on the tortilla wrap
4. Put a little of the fresh sage on top of the cheese
5. Place pear slices on top
6. Finish off with a little bit more of the Blue Cheese, remaining sage and bacon
7. Place on a cookie sheet and warm in the oven for about 10 minutes
8. Remove from oven and cut in to four wedges
9. Feel free to fold the finished pizza wedges in half for easier eating and enjoy!