Sunday, September 4, 2011

Blueberry Lemon Cheesecake


It was high time I featured a desert here. With Labor Day coming tomorrow signaling the end of summer, I decided to honor the lemon. I found this recipe in The Yogurt Bible.

I can't remember the last time I made a cheesecake by hand. It's been so long, in fact, that I had to borrow a 9 inch spring pan from my mother. This is not your usual cheesecake. When I think of cheesecake, a dense cheesy slab of sweet creamy goodness comes to mind; thick and leaving you stuffed. But this one is light and bursting with the refreshing flavor of fresh lemon. The shortbread cookie crust helps out too. Also, it's more of a tart thickness even though it's made in a full size spring form pan. You don't have to limit this to blueberries. I'll try this again with fresh raspberries or a canned cherry pie filling. Whatever you decide, this is a delicious desert that will be gone before you reach for the second slice.

Preheat oven to 300 F.

9 inch springform pan, ungreased

CRUST:
1 1/2 cups shortbread cookies or graham cracker crumbs (put through food processor)
1/4 cup butter, melted

CHEESECAKE
2 packages (8 oz each) cream cheese
1/2 cup granulated sugar
3 eggs
1 cup lemon yogurt
1/4 cup sweetened condensed milk
1tbsp grated lemon zest
1tsp vanilla extract
2 cups fresh blueberries

1. Crust: in a bowl, combine cookie crumbs and butter and press in to bottom and 1/2 inch up the sides of spring form pan. Bake in a preheated over for 6 minutes or until firm but not browned. Let cool for at least 10 minutes.

2. Cheesecake: In a large bowl, combine cream cheese and sugar. Using an electric mixer, beat on low speed for 3 minutes or until light and fluffy. Add eggs, one at a time, beating for about 30 seconds after each addition. Beat for 2-3 minutes on low-medium speed until well combined. Add yogurt, condensed milk, lemon zest, and vanilla and beat for 2 to 3 minutes on medium speed.

3. Scrape cheesecake mixture over crust in spring form pan. Bake in preheated oven for 50 to 60 minutes or until the edge is firm. The center may be cracked and slightly wobbly. Turn off the oven and let cheesecake cool for 30 minutes in the oven with the door ajar. Transfer to a wire cooling rack and let cool completely. Cover and refrigerate for at least 2 hours or overnight. Serve garnished with fresh berries.

Sunday, August 21, 2011

Blue Cheese and Walnut Wafers


Finally, a slice and bake for cheese lovers! Come to think of it, I'd probably still be a good Catholic girl if the communion wafers where made out of Blue Cheese.

I came across this recipe somewhere on the Internet and it grabbed my attention as soon as I saw "blue cheese." I'm in love with the stuff. It's the butter to my toast, the apple of my eye, the peanut butter to my jelly. This was way too easy to make. If you've got a food processor, you've got this one in the bag. Serve them up next to a platter of red grapes, smoked almonds and a nice glass of wine. At first I couldn't imagine that the amount of ingredients used would produce two logs yielding 4 dozen wafers, but it really does. The wafers can be stored in an air tight container for up to a week but I can't image why, on God's green earth, you'd have any left after 15 minutes.

Two side notes:

1. I couldn't put walnuts in mine since I've had to cut them out for health reasons. But if you're okay with them, I'd triple the amount because too many walnuts is always a good thing!

2. When I made the logs and wrapped them in plastic, I stored them in the freezer until I was ready to slice them.

1/2 cup butter (1 stick) softened
6 oz crumbled blue cheese at room temperature
1 1/2 cups flour
1/3 cup finely chopped walnuts

Mix together the butter, flour and blue cheese in a food processor. The mixture will start to pull away and form a soft ball of dough.

Remove the dough and place it in a bowl. Mix in the walnuts. Cover with plastic wrap and chill in the refrigerator for 5 minutes.

Remove from the refrigerator and divide in to two balls. Form each ball in to an 8 inch log and cover well with plastic wrap. Chill for an hour.

Slice each log in to 1/4 inch slices. Place slices on an ungreased or parchment lined baking sheet and bake at 350 for 12 minutes or until lightly browned.

Monday, August 1, 2011

Cheesy Herbed Popovers


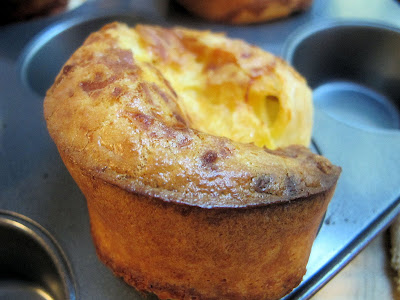
I can't say that I was always a fan of Emeril Lagasse but it was his recent cookbook, Farm to Fork, that made me give him a second look. There are so many tasty recipes in the cookbook and of course I gave the ones with cheese the highest priority. So last night I decided to whip up a batch of his cheesy herbed popovers. These were so simple to put together. While the rest of the dinner was cooking, these popovers were in the oven doing their magic as only popovers can do. Light, cheesy and perfect!

Ingredients:

4 tablespoons butter, melted
1/2 cup grated Parmigiano-Reggiano cheese
4 eggs
1 teaspoon salt
1/2 teaspoon freshly ground black pepper
1 1/2 cups whole milk
3 tablespoons heavy cream
1 cup all purpose flour
2 tablespoons chopped mixed herbs such as parsley, basil or chives
2 ounces of shredded cheddar cheese

1. Pre heat oven to 450 F

2. Brush the cups of a standard 12 cup muffin tin with some of the melted butter. Divide the Parmesan evenly among the cups.

3. Combine the eggs, salt, pepper, milk, cream and the remaining butter in a blender and blend until well combined. Add the flour and blend for 15 seconds, until smooth.

4. Add the fresh herbs (no more blending) and fill each muffin cup half way with the batter. Divide the cheddar among the cups and fill the muffin cups to the top with the remaining batter.

5. Bake the popovers at 450 for 15 minutes. Then reduce the heat to 350 and bake for 10 more minutes. DO NOT OPEN THE OVEN DURING THE BAKING TIME!

6. Remove the muffins tin from the oven and unmold the popovers on to a wire rack. Pierce the side of each popover with a small sharp knife to allow the steam to escape (this will help keep them from deflating.) Serve immediately.

Sunday, July 10, 2011

Apricots with vanilla blue cheese


It's been quite a while since I've posted here. Life just gets in the way sometimes PLUS I got hit with an acute case of Diverticulitis a few weeks ago. While I was recovering, my food was limited to a very bland diet which did not include cheese. But I have been dying to get back here.

Yesterday I bought some fresh apricots. I thumbed through my copy of The Great Big Cheese Cookbook and came up with an adapted version of Miniature Blue Cheese Balls with Winter Fruit. Summer is the perfect time to mix up some fresh fruit and cheese. I think these would make a lovely presentation at a summer cocktail party or brunch. The original recipe calls for 30 apricots; I used about 6 which yields 12. Also, I opted for no pecans since I can no longer eat nuts but I think they would add a delicious kick.

Ingredients:

6 fresh apricots
1 teaspoon pure vanilla extract
4 tablespoons cream cheese, at room temperature
4-5 tablespoons crumbled blue cheese
a handful of toasted and chopped pecans for garnish
Drizzle of honey

Directions

Wash, dry and cut in half the 6 apricots; arrange on a plate.

In a small bowl, mix together vanilla, cream cheese and blue cheese.

Put a small scoop of the vanilla cheese mixture in to the center of each apricot and garnish with pecans.

Drizzle some honey over the apricots.

Ready to serve!

Saturday, April 23, 2011

Easter Cheese Bread

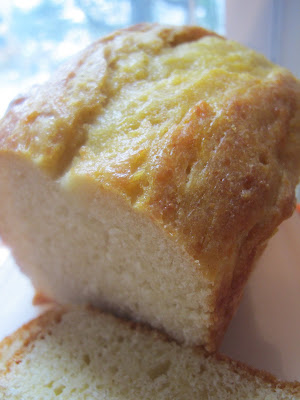
It seems like an eternity since I've posted here. But with Easter less than 24 hours away, how can I not give cheese the highest praise? This morning I brought a bottle of wine next door to my next door neighbor as an Easter gift. She walked over to her dining room table and handed me a loaf of bread wrapped in tin foil. "It's my mother's recipe for cheese bread," she said. Oh my goodness...she had me at cheese. I couldn't run home fast enough to unwrap it and slice through it. She told me that she has a family tradition of baking several loafs of Easter Cheese Bread just once a year and it is always on the Thursday before Easter Sunday. That would explain the amazing smell coming through our shared wall of our houses two nights ago. And just to make things more interesting, my neighbor once owned a successful Italian restaurant with her brother. They didn't cook for four; they cooked for dozens and that would explain the recipe that she handed to me upon my request:

Easter Cheese Bread

1 ¼ cup oil

15 eggs

14 cups or 4 pounds of flour

3 teaspoons salt

1 tablespoon sugar

1 teaspoon white pepper

3 cups warm water

3 packages yeast

7 cups or 2 pounds of parmigiana cheese

3 teaspoons baking powder

Make a well with dry ingredients and cheese. Put yeast in bowl with sugar and ½ cup warm water. Let sit 10 minutes until bubbly. Then in well, add in beaten eggs, oil and yeast mixture. Knead and mix until combined. Put in greased pot. Grease top of dough. Put wax paper over dough and then a towel. Let rise until double in size. Punch down and divide in to 4 pieces. Shape and put in to greased loaf pans. Let rise until top of pan. Bake at 350 for 40 minutes or golden brown. Brush with egg wash (yolk and water). The egg wash will set with the heat of the bread.

I'm certainly not going to make that large of a quantity. I'm playing with the numbers and cutting it down to a third. That should make about 2 loaves. There are other Easter Cheese Breads on the Internet. I found one here and here. I'm going to go with my neighbors' recipe because it was absolutely outstanding.


Toasted up with a slather of butter and some Cranberry Apple Butter...to die for!


Forget the jelly beans and chocolate bunnies. My guests will be lucky if this bread makes it to the table tomorrow night. Happy Easter!

Sunday, February 20, 2011

Cheese Danish


I know, it's not some magnificent cheese that we can barely pronounce that I'm writing about today. But it is Sunday morning and I think Sunday mornings are all about a good cup of hot coffee and a warm sweet treat to go with it. When I asked my husband what he might like for a lazy Sunday morning, he replied, "Cheese Danish." So off I went in to the land of Google and came across Ina Garten's Easy Cheese Danish recipe. The recipe makes 8 flaky and delicious cheese danish. Put them on a plate and watch them disappear. It'll be the best magic trick you've performed since grade school!

Ingredients
* 8 ounces cream cheese, at room temperature
* 1/3 cup sugar
* 2 extra-large egg yolks, at room temperature
* 2 tablespoons ricotta cheese
* 1 teaspoon pure vanilla extract
* 1/4 teaspoon kosher salt
* 1 tablespoon grated lemon zest (2 lemons)
* 2 sheets (1 box) frozen puff pastry, defrosted
* 1 egg beaten with 1 tablespoon water, for egg wash

Directions

Preheat the oven to 400 degrees F. Line a sheet pan with parchment paper.

Place the cream cheese and sugar in the bowl of an electric mixer fitted with a paddle attachment and cream them together on low speed until smooth. With the mixer still on low, add the egg yolks, ricotta, vanilla, salt, and lemon zest and mix until just combined. Don't whip!

Unfold 1 sheet of puff pastry onto a lightly floured board and roll it slightly with a floured rolling pin until it's a 10 by 10-inch square. Cut the sheet into quarters with a sharp knife. Place a heaping tablespoon of cheese filling into the middle of each of the 4 squares. Brush the border of each pastry with egg wash and fold 2 opposite corners to the center, brushing and overlapping the corners of each pastry so they firmly stick together. Brush the top of the pastries with egg wash. Place the pastries on the prepared sheet pan. Repeat with the second sheet of puff pastry and refrigerate the filled Danish for 15 minutes.

Bake the pastries for about 20 minutes, rotating the pan once during baking, until puffed and brown. Serve warm.

Monday, February 14, 2011

Gorgonzola Cheesecake


I've been wanting to try this Gorgonzola cheese cheesecake since I discovered it in The Great Big Cheese Cookbook last summer. Here's the catch though: I knew I would be going completely over the handle bars if I made the 8 inch size. So this weekend I drove to Kitchen Kapers and purchased a mini springform pan (4.5 inches) for $7.50. I cut the recipe in half and I now have a lovely little cheesecake that will store nicely in the refrigerator for the duration of the week. I'll put a slice on a toasted bagel in the morning. I'll sneak a slice or two before dinner. Hey, maybe I'll give myself a facial with it! And can I just rave about how good a slice goes with a grilled steak? My husband was in heaven tonight when I put a slice next to his grilled flank steak. This cheese cake is so versatile and so easy to throw together. I loved the extra little crunch of the toasted walnuts and the addition of honey gives it a very subtle sweetness. This cheesecake is so sinfully good that I'll probably have to get down and do 100 Hail Marys by the time I finish it off. But it was worth every delicious bite...


2 (8oz) packages cream cheese, at room temperature
2 cups crumbled Gorgonzola cheese, at room temperature
3 eggs, at room temperature
1/4 cup sour cream
2 Tablespoons clover or orange blossom honey
Pinch of kosher salt
Pinch of fresh cracked pepper
1/4 cup of toasted walnuts
1/2 cup caramel topping
red grapes and crackers to garnish

NOTE: if you want a smaller mini cheese cake, cut the recipe in half and bake it in a mini 4.5 inch springform pan

1. heat oven to 300F. Spray an 8 inch springform pan with cooking spray. Line the bottom with parchment paper and spray again.

2. In a large bowl beat the cream cheese until smooth. Measure out 1/4 cup of Gorgonzola and set aside. Add the remaining blue cheese to the mixing bowl. Add the eggs, one at a time, beating well after each addition. Scrape mixture off the side of the bowl. Add the sour cream, honey, salt and pepper. Beat until combined. Pour in to the pan.

3. Place a shallow pan of water on the bottom rack in the oven and place the cheesecake on the rack above it. Steam from the water will help prevent cracks in the cheesecake. Bake 40 minutes.

4. Remove the cheesecake from the oven. Sprinkle the reserved blue cheese and walnuts over the top of the cheesecake and bake 10 to 15 minutes more, until lightly browned. Cool in the pan to room temperature.

5. To serve, cut the cheesecake into wedges. Drizzle each plate with caramel sauce. Place the wedge on the plate. Garnish with grapes and crackers.

Sunday, February 13, 2011

Yukon Gold potato and Manchego cheese tart


I'm not really sure why this recipe is called a "tart." It's more like a slightly crispy version of Potatoes Au Gratin. All I can tell you is that it's simple to make and delicious to boot. I love the buttery and smooth flavor of the Yukon Gold and the Manchego is a perfect compliment to this dish; not too strong, not too mild. Even my daughter asked for more last night when she finished her first plateful. I think I've got a junior cheese junkie in the making. As is very often the case, I found a nice chunk of Manchego at my local Trader Joe's for less than $5 which covered the amount needed for the recipe and some left over. Manchego melts very nicely. It's a wonderful choice to add to quesadillas, potatoes dishes and omelets.

Let me give you a little background on Manchego:

Manchego (officially Queso Manchego) is a cheese made in the La Mancha region of Spain from the milk of sheep of the Manchega breed, which is aged for between 60 days and two years. Consider this cheese "The Don Quixote cheese."

Manchego has a firm and compact consistency and a buttery texture, and often contains small, unevenly-distributed air pockets. The colour of the cheese varies from white to ivory-yellow, and the inedible rind from yellow to brownish beige. The cheese has a distinctive flavour, well developed but not too strong, creamy with a slight piquancy, and leaves an aftertaste that is characteristic of sheep’s milk.

RECIPE:

* 1 tbsp olive oil
* 6 Yukon Gold potatoes
* 1 tbsp chopped parsley or oregano
* 2 cloves garlic, thinly sliced
* 1/2 cup freshly grated manchego cheese
* salt to taste
* freshly ground black pepper

1. Preheat the oven to 400°F.
2. Heat the olive oil in an ovenproof non-stick skillet over medium heat.
3. Peel the potatoes and cut them into very thin slices.
4. Layer half of the potatoes in overlapping slices to cover the bottom of the pan.
5. Sprinkle with the oregano or parsley, garlic, manchego cheese, salt and pepper (be careful not to sprinkle the cheese on the side of the pan, or it may stick).
6. Add the remaining potatoes in overlapping slices and sprinkle with salt and pepper.
7. Cover the skillet with foil and place it in the oven and cook until the potatoes are tender, about 15 minutes.
8. Remove the skillet from the oven, remove the foil,carefully loosen the edges of the potatoes and turn the tart onto a plate or platter. (NOTE: at this point I sprinkled some parmesan cheese on top and put it under the broiler for a few minutes until brown and crispy.)
9. Cut the tart into wedges and serve.

Thursday, February 3, 2011

Cotija Cheese

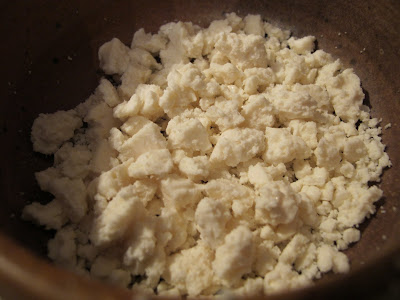
A few days ago at Trader Joe's I found a nice slab of Cotija (Ko-Tee-Ha)cheese.

This is a Mexican cheese that is semi-hard and crumbles like Feta. It's flavor is somewhere between Feta and Parmesan. Slightly salty but not overpowering, it works nicely as a topping on tacos, enchiladas, salads and pasta.


I needed to make a quick meal for myself tonight so I boiled up some Linguine and tossed it with olive oil, garlic, baby spinach and fresh tomatoes. The grand finale was a little mountain of crumbled Cotija cheese. Perfect and satisfying!

Monday, January 31, 2011

panko crusted eggplant stacks with red wax gouda


Today I'm showcasing Red Wax Gouda. I'm a shameless cheese stalker at Wegman's Cheese Department and I think they offered me samples of three distinct types of Gouda just to get me to eat something and leave the poor cheeses alone. I settled on the Red Wax Gouda because I loved the mild semi-soft creamy taste of it. I got a nice sized wedge of it for $2.80.


Gouda is an excellent choice if you like semi-soft mild cheese. Not soft enough to spread with a knife but soft enough to cut in to chunks and it melts nicely if you're using it for cooking. In fact, I think that this is a candidate for one outstanding macaroni and cheese dish. But today I decided to make Panko Crusted Eggplant Stacks with Red Wax Gouda for lunch. Oh. My. God. It's so simple, really.

Start off with a nice eggplant and cut it in to some nice semi-thick slices. Coat the slices with an egg wash, dip them in to some panko crumbs and saute them in olive oil on medium high heat until they are brown and crispy. Drain on paper towels and set aside.

Preheat oven to 400.

In the meantime, cut a fresh tomato in to thick slices. Cut your gouda in to some thick slices as well. Line a cookie sheet with foil and let the stacking begin. Eggplant-tomato slice-gouda slice-eggplant, etc...

Today I got a little adventurous. I made two eggplant stacks. On one stack I put some olive tapenade in between the layers and on the other stack I put some prepared pesto in between the layers for some extra kick. You can find both of these delicious products at Trader Joe's.

Here is the stack with the olive tapenade:

Here is the stack with the pesto:

Place the stacks on the foil lined cookie sheet in to the oven and bake at 400 until the cheese melts. About 10 minutes. While the stacks were baking in the oven, I took a handful of wild baby arugula and tossed it with a handful of toasted walnuts and a splash of raspberry walnut vinaigrette. Amazing Grace. Seriously.

Thursday, January 6, 2011

Brazilian Cheese Bread


I'm not kidding you when I tell you that this is the easiest recipe I've ever followed. If you have a blender and a muffin tin, you can look like a culinary rock star here. I think these will make a weekly appearance at our house and I would choose them over the Cheddar Cheese Puffs that I made on Christmas.

I seem to be on a cheese bread kick lately. Brazilian Cheese Bread is simply addictive and absolutely delicious. You can play around with different cheese to produce different tastes. I chose to use Parmesan cheese and I added a few turns of fresh cracked black pepper. When these delectable little beauties are baked, the result is a light and airy texture with a nice chewy texture in the bottom of the bread. The recipe calls for tapioca flour which can easily be found at a health food store or Whole Foods store. Once you have secured the tapioca flour, the rest is easy. The best part is that you could whip up the batter and put them in the oven about 20 minutes before serving dinner and you have yourself nice hot cheese bread to serve up. It looks like you spent so much longer but all it involved was a blender and a greased muffin tin. BONUS: tapioca flour is gluten-free for those who eliminate gluten from their diet.

Ingredients

* 1 egg (room temperature)
* 1/3 cup olive oil
* 2/3 cup milk
* Scant 1 1/2 cups (170 grams) tapioca flour
* 1/2 cup (packed, about 66 grams) grated cheese, your preference.
* 1 teaspoon of salt (or more to taste)

Preheat oven to 400°F. Grease a mini-muffin tin. Put all of the ingredients into a blender and pulse until smooth. You may need to use a spatula to scrape down the sides of the blender so that everything gets blended well. At this point you can store the batter in the refrigerator for up to a week.

Bake in the oven for 15-20 minutes, until all puffy and just lightly browned. Remove from oven and let cool on a rack for a few minutes.

Eat while warm or save to reheat later.

Enough batter for 16 mini muffin sized cheese breads.

Note that Brazilian cheese bread is very chewy, a lot like Japanese mochi.